Posts

Showing posts from 2009

Wait...what is this? A new post?

Image
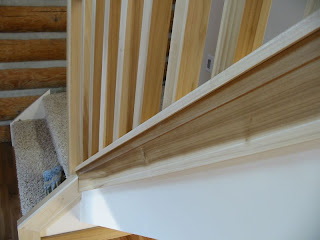
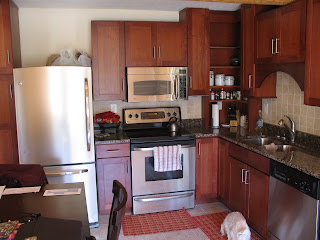
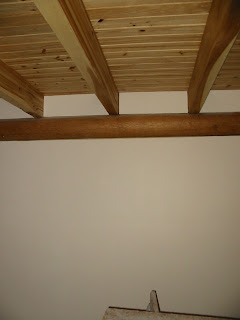
About time I guess. We've been enjoying having some free weekends to go biking & golfing. Most of the inside trim (door & window casing, baseboards etc) is finished & clear-coated. Here's some trim around the stairs: More trim going up the stairs, we tried to "show off" some of the girders & RPSL's where the drywall butts up to them. Gives it a different look, since the logs aren't milled to 1 size, you can see the taper & character. Here's our front picture window with trim on it (and a bit of chinking on the outside still!) Down bath: Used some small 1/2" x 1" poplar trim for around the 4x10 beams for the second floor, also handy as we used it where drywall butts up to RPSL's & girders. Dining room, we still have to find a matching island to go in the front corner of the kitchen for more cabinet & counter space. We finally started trim on the outside of the windows. We used the same stain as on the gable ends,

Couple new pics

Image
I've been busy with work now that it's warm again, sorry for no updated pics! Here's the kitchen, we finally received the fridge that was ordered, much better than the mini fridge we were borrowing :) Here's what our interior doors look like, they are maple (wanted poplar, but too $$) & shaker-style 2 panel. The trim & baseboards are all poplar. Here's the closet doors in the downstairs bedroom: Just have 1 window left to trim, and the upstairs baseboards, then to the outside stuff, porch etc.

Moved in!!

About a year and a half later, we have officially moved in! The final inspection went fairly well, we have a couple minor things to fix so the inspector is happy. We are finishing up with trim & baseboards, all the interior doors are in & trimmed out as well. We'll start on the outside porch & entryway once all the inside is completed & moving boxes unpacked :) Pics to come soon....

Lighting & other stuff

Image
So after looking at several stores around Indianapolis and not finding exactly what we were looking for we finally decided to look online. We found this great website called Lighting Universe and was able to find something! Our electrician is out this week finishing all the electrical stuff, switches, plugs & such. Here's the front done with the doorbell & outside light: We picked up our custom door bell while we were at our good friends Stacey & Travis's wedding in Cannon Beach Oregon. Here's the dining room light, and you can see I finished the trim around the side door. We had to use 5" wide poplar in order to hide the switch wiring. Here's the hall light, there's another around the corner. As you can see we still have no interior doors. They are supposed to be done on Friday. Here's a window all trimmed out: The dirt guys are also out, we are tired of having no room to park 2 vehicles & trying to back out in the dark, so we had them cir

We have an address :)

Image
We used a small piece of left over poplar from the window trim to make an address mounting board. I ran my router around the edge to give it a bit of definition, then Jessica stained it & placed the numbers. Turned out good for $3.97 I think :) We'll do the same for the doorbell & outside lights. We also put in a mailbox, I plan to make a "custom" one that matches the house theme, but no time for that now so it'll have to wait:

Stairs finished, & carpet in

Image
Jessica & I cut all the angled balusters on the weekend, and I installed them yesterday after work. Everything turned out great, the railing is nice & solid & it looks good. Just have to give it a clear-coat. The carpet guys finished everything on Monday as well. It's nice to have something soft to walk on. Master bedroom: Upstairs living room:

Stair building 101

Image
Our stair parts finally came in, so I picked them up the other day after work, along with all our trim (window + door casing, baseboards) It's all poplar, same as the 4x10 beams so it should look good once it's all installed & stained. The newels attach using a long 2 sided bolt, 5" lag on one side, & threaded on the other. The newel had to be drilled to slide over these. Here is the lag bolt installed in the floor, it goes through the 2x6 T&G, into the 4x10 beam below. Here is a close-up showing the curved washer & nut that secures the newel post tight to the floor. This nut is a pain in the butt to tighten, as the 1 1/2" hole in the newel post only allows about an 1/8 of a turn every time. The good thing is these are very solid once tightened. The newel overhangs because we plan to put a small piece of trim on the edge, to cover the cut ends of the 2x6 flooring. Balcony newels installed: So far I've figured out, estimate the time to install a

Kitchen Backsplash

Image
We found some 4x4 white travertine stone(limestone type material that is harder than limestone but softer than marble). It's "tumbled" so it has soft edges & very random. Seems to fit in well with the logs & such. Here is the backsplash with the grout freshly finished. Jessica does a great job with the tile grout. (More attention to detail than me!). Notice anything different (other than the grout)? We had to "find" the outlet that I accidentally covered with cement board & tiled over. Luckily I had a picture with the framing that showed it, & we were able to pop off 2 tiles, the grout them back on after cutting around the box.

Kitchen backsplash & more cleaning

Image
The hardwood flooring is all done finally, haven't taken a decent picture because it needs the dust cleaned off :) We also scrubbed some more chinking off the logs, only a closet to go, then it's all done. I started the kitchen backsplash today after cleaning a bunch of garbage out of the front of the yard. Put in the last 2 electrical boxes, then installed some 2x4 blockings, and put up the cement board (Durock). We had about 2 extra boxes of tile from the kitchen floor, so we cut them down to 4x4 tiles & planned to use those. The tiles weren't the same size, & after the first row I could tell it just was not going to look good. We pulled them off & cleaned the mortar off. Will be buying some other 4x4 stone to put up instead. Will hopefully get this finished up after work, by then our stair railings should be in.

Hardwood Installation

Image
Hey everyone, Tired of looking at the toilet yet? hah. Last weekend Mark (coworker) came down to help us get started properly laying the hardwood flooring. He has done alot of flooring with his Dad, so it was a huge help having him come down & help for the day. Thanks again Mark! Today we laid another 11 boxes of flooring. We have about 120SF left to finish tomorrow. This is 3/4" solid Hickory. So far it's looking great (don't mind the dust). Tim came down to help, thanks! It's mostly light colored, but alot of grain & variation, seems to fit well.

Plumber is here again.

Image
We were finally ready to call Gary the plumber back so he could do his finish work. I never thought I'd be so excited to hear the sound this made :) Haha, it will be much nicer than using nature. I think Jessica is happier than I am. Marley say's hi, little guy wouldn't stay in the picture for me. Here's our water heater (free from the REMC, thanks!), no hot water yet until electrician wires it up in the panel. We even have a working (cold) shower: Here is next weekend's project, hardwood flooring. Hopefully by then the stair railings will be in.

Weekend work

Image
Jessica spent the weekend cleaning chinking off the inside logs. Fun job :) I spent most of the weekend in the crawlspace insulating the floor. We had a freak heat-wave, all the snow melted & it was close to 50, so I stopped by the local plumbing shop, & picked up the proper connector to attach the water main to the meter. It was a 'bit' muddy but I got it hooked up, no leaks. We also finished the guest bath vanity top + faucet. We had a different faucet picked out, but it was a 4" center, the top we bought was 8", so we returned the faucet & found one similar that fit better. Almost ready for the plumber...

Vanity top....

Image
We found a decent deal on solid-surface vanity tops. The sinks are built onto the tops from below. I took them down tonight & worked on the double upstairs. The single was chipped on the corner so have to return it. I installed the faucets first since it just looked easier to do it before mounting the top. They are made by 'Cifial', found a good deal on a pair of them, worked out well. Have to run some silicone around the top edge still where it meets the wall, & the drawer doesn't fit in-between the sinks (oval sinks a bit wider??...) but almost done. Getting closer :)

Cabinets & countertops.

Image
Our friend Mike helped us move the granite counter-top after work on Friday night. Heavy stuff is all I have to say, well over 300 lbs from my calcs. Thanks for the muscles Mike :) We finished the cabinets today. We need to find a matching piece of glass for the doors on the right side, and need to have a 30" countertop cut down to 15" for the cabinet base I shortened: Here's a closeup of the granite, & the undermount sink. We still need to figure out how to finish the backsplash area. Likely some kind of tile or stone of some sort. Any idea's?? Southern Indiana actually got a decent amount of snow for a change, over a foot in a about 24 hours. We had lots of animals enjoying the yard this weekend, a few dogs & a deer or something that chewed under our lumber pile to get some fresh grass.

Kitchen Cabinets

Image
We loaded all the base cabinets (except 1) & took them to the house. The 2x4's against the log wall worked great, the cabinets all lined up perfect & it was easy to secure them. There is one more base cabinet to install, but when we found these (display in a local kitchen shop) the other base was a 30". We only have room for a 15" between the stove location where the wire is coming out of the wall) & the fridge (beside the tall cabinet). I dis-assembled the 30" upper cabinet & shortened it this afternoon, just have the base to finish, then onto the countertops.

Vanities & cabinets

Image
We installed the bath vanities today, the hardest part was getting the 60" vanity upstairs! Here's the 24" in the downstairs/guest bathroom. They are natural maple: We took an idea from another LHBA member, we used 2x4's against the log wall, so we would have something "plumb & square" to install the other kitchen cabinets onto. We found the area/log that stuck out the farthest, which happened to be right in the corner where the framed kitchen wall butts onto. Then we installed the first 2x4, & plumbed it using shims of various sizes. Then we snapped a line that was square along the floor, & installed the rest of the 2x4's, each one centered where a pair cabinets will join, so there is a solid area for each to be secured. Will see how well the idea works tomorrow when we start installing the kitchen cabinets.

Tile is finished

Image
We had a week away from working on the house, since I was in Canada for meetings & training. Was good to see everyone again. We rented a tile saw on Saturday & used it for all the pieces around pipes, registers etc. Today we grouted everything, wasn't too bad, other than a lot of bending down & kneeling. Here's the downstairs bathroom finished (needs a final cleaning/buffing to get the haze off). Here's the kitchen, really needs to be buffed clean :) The actual color is closer to the tile on the very right near the log wall. Our bath vanities are in, so those will go in next, along with all kitchen cabinets.

Painting + tile

Image
Don finished up with the painting & it looks great, the cut-in lines along the ceilings are near perfect. Here's a shot of the downstairs bedroom, with the finished ceiling we did the other weekend. Here's the tile in the utility room & downstairs bath. We still need to rent a tile saw to make the detailed cuts around registers & pipes etc, then will finish the grout after that. Bathroom tile, still needs a few tiles cut: Today we tiled most of the kitchen. We picked a neutral color that should go well with the hardwood flooring & cabinets.