Posts

Showing posts from April, 2008

Loft floor joists

Image
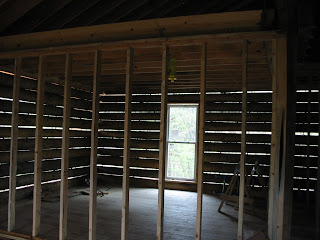
I'm working nights this week, so I was able to spend the afternoon at the house. Got 1/2 the loft floor joists put up. Should be able to finish it off tomorrow. A view from the back:

Loft Floor

Image
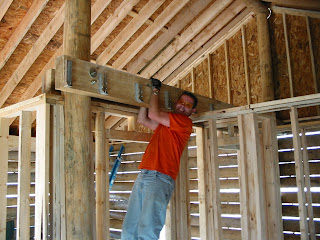
We worked on the floor of the loft, Tim and Jeff were able to get the (2) 4x10's up for the middle girder. They hung the joist hangers first, then lifted them up and through bolted them to the Ridge Pole Support logs. The 4x10's were quite heavy, but we managed to get them up without the chain hoist. Here's Tim making sure the girders are secure....hah. Here's one of the outside rim joists. These are lag bolted the same as our first floor. This way the entire loft is supported by the RPSL's & wall logs. We'll be adding about 450 square feet of loft area/storage with this. Close up of the 3/4" threaded rod that secures the 4x10's to the RPSL.

We have a front doorway

Image
Finally, no more ducking & walking in sideways with tools. We cut the doorway to the proper size now that we have our entry door picked out & bought.

Bedroom Windows

Image
Today we cut in the last of the windows in the cabin. We installed the (2) egress windows in the bedroom.

April 19, 2008: Picture Window

Image
On Friday we went and picked up (2) egress windows for the bedrooms & Picture window for the dinning room. While we where there we also ordered the doors for the living room and also the dinning room. The living room door was not exactly what Jessica wanted, but the pricing was just amazing so it'll do. Here is some pictures of installing the window. it was pretty scary cutting such a large hole in the wall. We had to end up pulling the truck in front of the opening it made installing the window so much easier. Pretty good looking window, it makes the room look so much bigger and lets in so much light.

April 13, 2008: 2nd Floor Framing

Image
Jessica and I did all of the Second floor framing, in one weekend. It was pretty easy compared to the first floor. It helps when you have an idea of what to do.

April 10, 2008: Temporary Stairs

Image
Climbing up and down a ladder was getting a bit old, so I built some temporary stairs with the extra tongue & grove from the floors, and left over 2x8 from the roof work.

April 8, 2008: Cutting in the Kitchen Doorway

Image
Cutting in the Kitchen door way by far the largest cut we had made in the logs. Once we did so it caused the wall to wobble a bit, since it was a 30 ft wall with no support. In order to stiffen up the door, I cut in a slot about 1/8' along the sides so that I could insert 2' angle iron. The wall is stiffer now then before we even cut the door to begin with. Completed door frame:

March 30, 2008: More Windows

Image
We cut in 3 windows, the two in front and the one on the side.

March 22, 2008: Second Floor

Image
We placed 2x6 tongue & grove for the second flooring. We had several people out to help us that weekend. Tim, Jessica's Dad and brother (Bud). Tim and Jeff laid the flooring while Jessica's Dad and brother cut the sizes that we needed. Tim hard at work :) This is what the ceiling will look like on the first floor with the exposed rafters:

Feb 17, 2008: First floor framing

Image
Mike came out to help us again, since we were clueless when it came to framing. He used to work on a couple framing crews, so he showed us what needed to be done. It was not an easy task even with Mikes help. We had modified the original floor plans so that we could maximize the space, causing some area's of the framing to be tricky. Thanks Mike! Getting some walls put up:

Feb 1, 2008: Second floor beams

Image
Found a local sawmill to cut our second floor beams. I rented a trailer & brought these to the lot. All I can say is these 4x10 poplar beams were about 200 lbs each! Dusty!! Jessica is using an electric planer to clean up the rough-cut beams. Here's a before: & after planing & sanding: We used a 2 ton chain hoist to lift the beams onto the girder logs. Worked quite well & safer than trying to get them up a ladder hah.

Jan 12, 2008: First window

Image
Here's the first window that we ever put in....it's the smallest one in the utility room. Built the window buck out of 2x10 to fit the wall & frame the window. Here I am with our first window installed. We cut another hole in the wall for the bedroom window, but will end up waiting to install it, since bedroom windows must be certain sizes for fire escape.

December 30, 2007: Girder brackets

Image
These are 1" diameter lag bolts, they'll be used to secure the girder brackets on the front & back. They were special ordered from a place in Washington. We had a local guy weld our girder brackets. I cleaned them up with a grinder then primed & painted them. Here's the front bracket installed. (Using the huge lag bolts from above). Here's the center bracket. This one is through-bolted with four 1" threaded rods since it has twice the load as the front & back.

December 21, 2007: Door & window

Image
Since we could climb under, we cut a temp doorway into the front of the house. This is the location of the actual entry, but we left it smalled until we have a door picked out. Here's the doorway after chainsawing & sledgehammering. Here's Jessica standing on the ramp we built. Makes it easy to get material in & out instead of stairs, & it was quicker to build these anyways.

December 7, 2007: First floor

Image
Jessica is working on lag-bolting the rim joist to the first row of logs. Tim is nailing the joist hangers onto the rim joist. We started off doing it the long, hard way, since we didn't know any better. After some helpful tips from Mike, we used a speed square to mark everything & they went on alot quicker. Here is a double 2x12 for a girder. This splits our span on the floor joists to 15' instead of 30'. Here are the 2x12 floor joists. There was just a couple left to do here, then we added blocking to stiffen everything. Then we spent another weekend putting the subfloor down. Jessica's brother in law Brad came out to help the first day which sped things up alot :)
November 28, 2007: Roof!

Image
We hired a friend of a friend to do the roof for us (Ryan Baber Co.). It was just too high & too complicated for us to try & do ourselves. They had to build some interesting scaffolding since we didn't have any floors for 2 stories. Here is the finished roof with some 30 year dimensional shingles.

November 3, 2007: Ridge Pole day!

Image
Mike & I "inspecting" the ridge pole. Jessica picked this log out, it's the largest, straightest log we had. Nearly 16" on the butt end & 47' long. I'm standing on a pallet on the forklift while Jessica is driving the machine. Mike is standing on the wall making sure I cut the RPSL correctly :) Here we are setting the ridge pole. It was a stressful day. The forklift was extended all the way here, just made it. Climbing up the 32' extension ladder to pin the ridge pole....fun! Here's Jessica down near the truck... I'm about 30' in the air on the forklift.